How to use Supabase securely in Astro projects
Supabase and Astro
Section titled “Supabase and Astro”Supabase is an easy-setup database that comes with a few extra services for us devs. It is easy to use, but it is also easy to hop over some serious security concerns, so we are going to try and make a quick how-to of an Astro integration of Supabase.
API Keys
Section titled “API Keys”Supabase is intendedly open with their API keys. We have a public key that is deliberately made to be used client-side, not worrying about what can be seen in the browser, and a public URL that we can also use without worrying.
These are made that way because Supabase has a very robust RLS (Row Level Security) system that gives or denies permissions on each of the four CRUD operations for each of our tables.
Apart from this, we also have a Service Key, which bypasses all of those security rules and gives us unfettered access to all data and operations on the database. This key is to be secured much more carefully, and cannot be used client-side, ever, as we would be giving up our entire database to whomever wanted to access it.
These policies allow us to give permissions to perform CRUD operations on the records of our database. If a CRUD operation has no RLS policy applied, it will be vetted to any users: each table has all CRUD operations restricted unless we open them using our policies. This is good, because our keys are intendedly public.
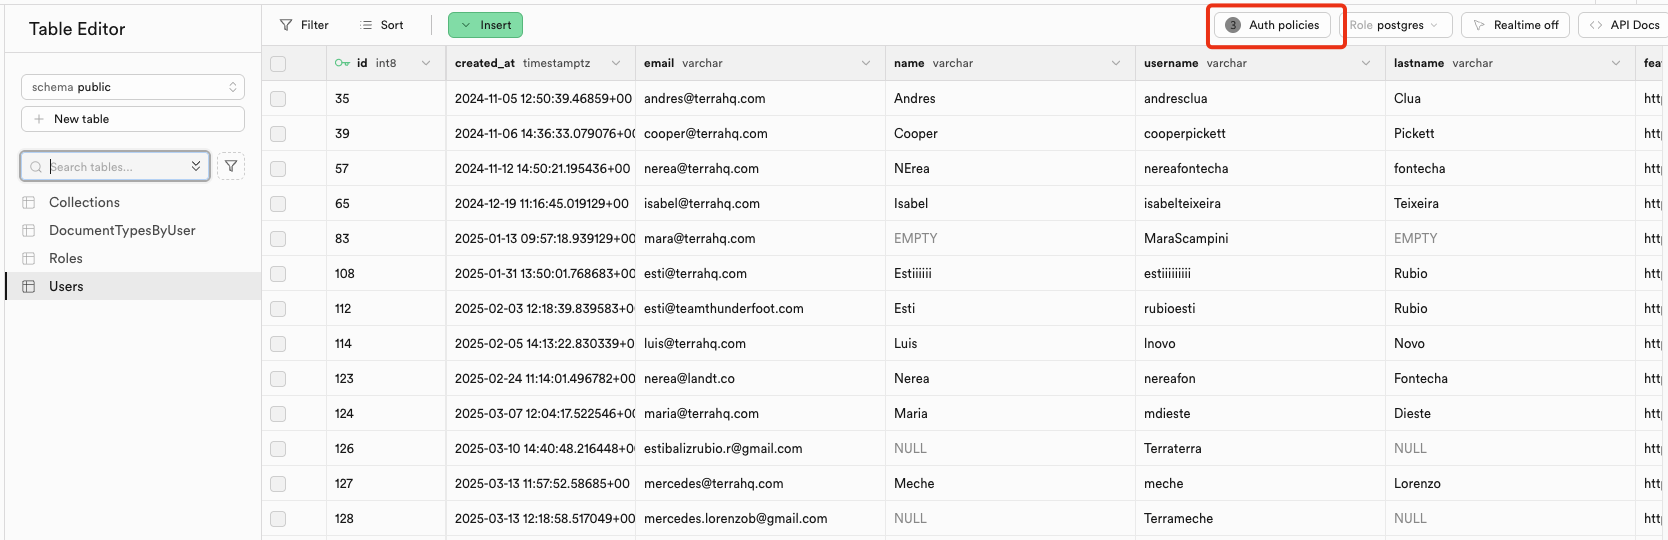
Our policies can be consulted and edited from the Supabase dashboard, either in each table:
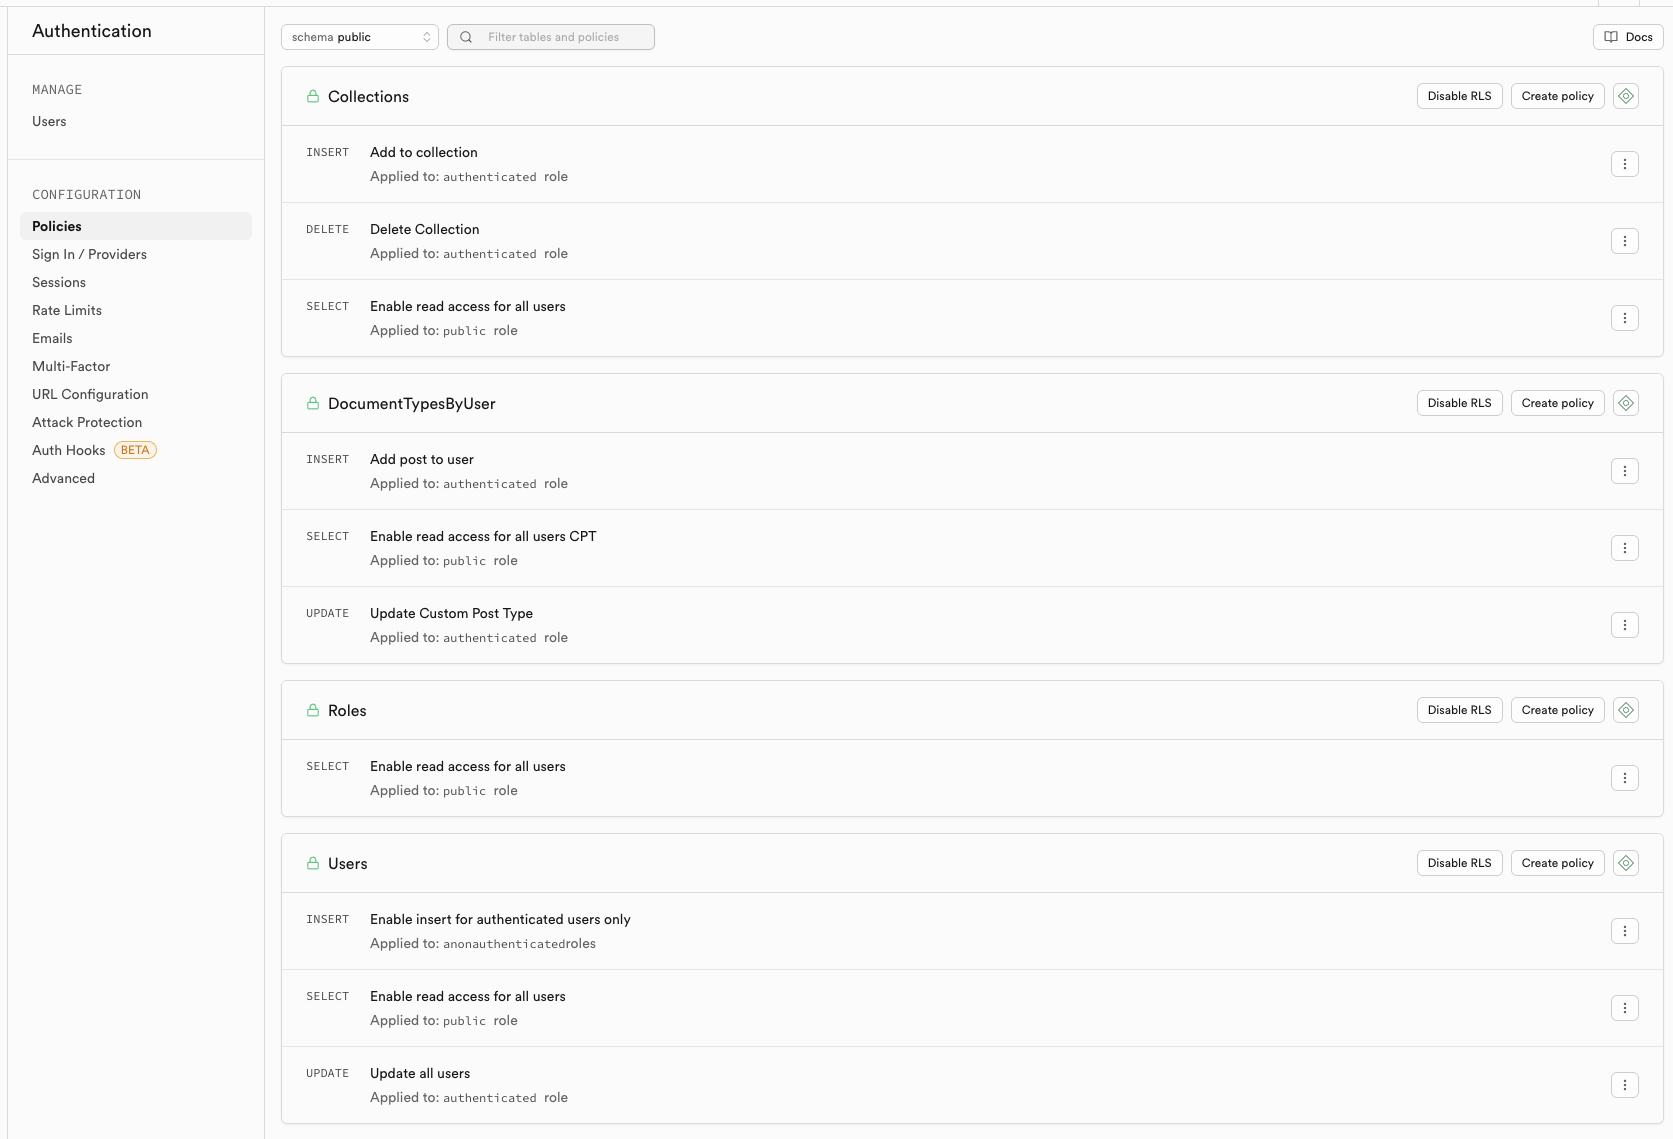
Or in our Authentication section, for a summary of all existent RLS policies:
We will need, in the phase of planification of our project, to determine the logic that we will apply to our policies. Going off from that, we will need to code our policies accordingly.
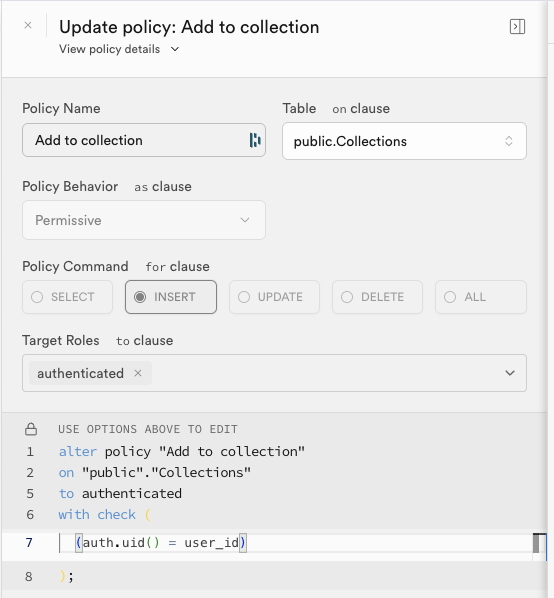
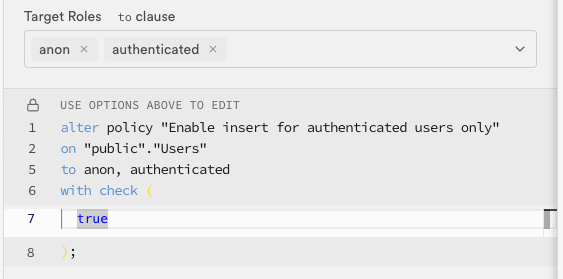
For instance, this would be an example of a policy allowing only the logged in user to edit their information (a user cannot add lines with another user’s ID in them):
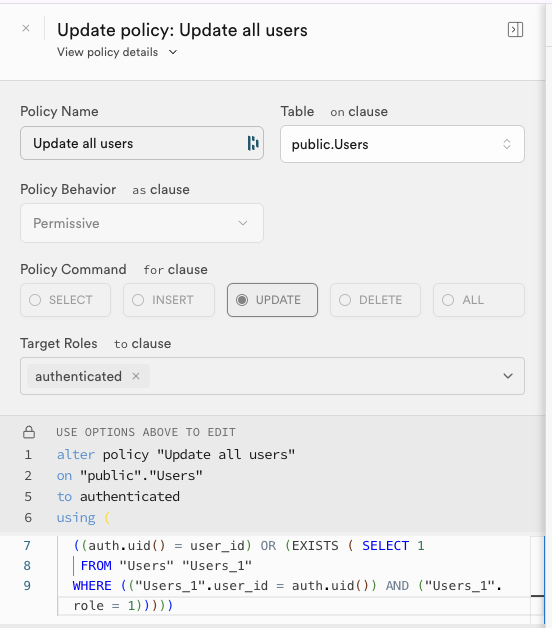
This would be a policy that allows both the authenticated user and the admin of the site to edit data (an admin can edit the user’s information):
This would be a basic policy that allows any user to perform an action:
This last one is very dangerous, we will only use it if we want something to be completely public. This will be more usual in read operations.
SSR Usage
Section titled “SSR Usage”Supabase is made to be used client-side, but they have recently started supporting server-side clients too, using their @supabase/ssr package. This will allow us to create clients server-side and perform operations from middlewares and API endpoints.
This ensures our authentication is handled via cookies and the client takes care of both the authentication itself as well as the refreshing of the tokens so the users can be logged in for a month before being asked to re-log into the site.
The setup of the client is as follows:
import { createBrowserClient, createServerClient, parseCookieHeader } from "@supabase/ssr";
const SUPABASE_URL = import.meta.env.PUBLIC_SUPABASE_URL;const SUPABASE_ANON_KEY = import.meta.env.PUBLIC_SUPABASE_ANON_KEY;
export const supabaseBrowser = createBrowserClient(    SUPABASE_URL,    SUPABASE_ANON_KEY  );
export const createServerSupabaseClient = ({ request, cookies }) => {    return createServerClient(SUPABASE_URL, SUPABASE_ANON_KEY, {        cookies: {            getAll() {                // Get the cookie string from the request headers                const cookieString = request.headers.get("cookie") || "";                // Parse the cookie string into an object and return it                return parseCookieHeader(cookieString);            },            setAll(cookiesToSet) {                cookiesToSet.forEach(({ name, value, options }) => {                    cookies.set(name, value, options);                });            },        },    });};
We are going to be using createBrowserClient, createServerClient and parseCookieHeader from the SSR package. Once we got our URL and public anon key in our .env file, we can import them here and create both the browser and the server clients.
Why do we need two clients?
Section titled “Why do we need two clients?”As we stated at the beginning of this section, Supabase was made to be used client-side, but when we work with frameworks such as Astro, that move part of that logic to the server-side, we need to be able to create a server-side client to perform operations such as the authentication of users. By using the SSR package, we ensure that both our client-side and our server-side clients work together and handle the authentication and authorization of users.
As we are using RLS policies in our database, it is important that our Supabase clients recognize our logged-in users and send their data when making operations in the database, because if they do not do that, our users will lack the authorization required to make such changes.
How do the cookies work?
Section titled “How do the cookies work?”Whenever we use our server client, we will work with Astro’s requests and cookies to send them over to the client so it can check the user before making any changes.
So if we use a function such as this one:
import { createServerSupabaseClient } from "src/lib/supabase";
export const checkAuth = async ({ request, cookies }) => {    // Create a server client for this request    const supabaseServer = createServerSupabaseClient({ request, cookies });
    // Get the session - the SSR client will handle cookies automatically    const {        data: { session },        error: sessionError,    } = await supabaseServer.auth.getSession();

    if (sessionError || !session) {        return {            user: { id: false, email: false },            authenticated: false,            visibility: false,        };    }
    // Get user role from database    const { data: dataVisibility } = await supabaseServer.from("Users").select("role").eq("user_id", session.user.id);
    const role = dataVisibility?.[0]?.role || 3;
    return {        user: session.user,        authenticated: true,        visibility: role,    };};
We are actively checking that the user is authenticated and we are receiving those request and cookies from the Astro components where we are checking that the user is, indeed, authenticated:
const { cookies , request} = Astro;const response = await checkAuth({ request, cookies });const { authenticated , user, visibility } = response;And we can manage redirections or actions to perform if the user is not authenticated from there. Here we are also obtaining all the data we need from the user to perform any actions that would require that in the site, such as sending emails or displaying user information, as well as the role of the user to redirect admin-only pages.
All of this can also be done through a middleware if it fits the structure of the site better.
Secure operations using the Service Key
Section titled “Secure operations using the Service Key”In case that we need to use our service key to perform operations, as if we need to retrieve data directly from our Auth table (which is restricted and we cannot apply new RLS policies to), we will always do it safely inside our server-side.
This means that if we want to make a table for our admins where we want to display our users’ last login date, we will need to make it through a secure route.
This can happen in two ways: we can make API calls or serverless functions where we create a client using the service role key.
Why can’t we simply create a server client using our service key?
Section titled “Why can’t we simply create a server client using our service key?”Because the instantiation of the client is made in a JS file client-side, so if we used our service key there it would be exposed to the browser.
How do we proceed?
Section titled “How do we proceed?”We will store our service key in our .env file as a private variable (never prefix it as PUBLIC_) and we will use it inside API calls or serverless functions:
import { createClient } from "@supabase/supabase-js";
const SUPABASE_PRO_ANON_KEY = process.env.SUPABASE_SERVICE_ROLE_KEY;const SUPABASE_URL = process.env.PUBLIC_SUPABASE_URL;
const supabasePro = createClient(SUPABASE_URL, SUPABASE_PRO_ANON_KEY);
Notice that here we do not use our SSR package, because we are performing operations with our service key the client does not need the information of whether the user is logged in (and this can be intended, as we for instance might want some non-logged user to be able to perform operations).
In case that we do need to check if the user is authenticated, we will do it by using our Bearer token, as we would do in a backend environment:
    const authHeader = request.headers.get("Authorization") || "";    const token = authHeader.replace("Bearer ", "");    const {        data: { user },        error: authError,    } = await supabasePro.auth.getUser(token);
    if (authError || !user) {        return new Response(JSON.stringify({ error: "Unauthorized" }), {            status: 401,            headers: { "Content-Type": "application/json" },        });    }
Authentication
Section titled “Authentication”Supabase clients provide us with methods to perform authentication, register and recovery of passwords.
Sign-in
Section titled “Sign-in”import {createServerSupabaseClient} from "src/lib/supabase";
export const POST = async ({ request, cookies, redirect }) => { // Create server client const supabaseServer = createServerSupabaseClient({ request, cookies });
// Parse form data from the request const formData = await request.formData(); const email = formData.get("email")?.toString(); const password = formData.get("password")?.toString();
// Check if email and password are provided if (!email || !password) { return new Response("Email and password are required", { status: 400 }); }
// Sign in with the server client - it will automatically handle setting cookies const { data, error } = await supabaseServer.auth.signInWithPassword({ email, password, });
if (error) { return new Response(error.message, { status: 500 }); }
// Redirect to the specified page after successful login const redirectURL = cookies.get("previousPage")?.value || "/reef-plus/finance-solutions/";
// Return the tokens because we need them to set the session in the browser return new Response(JSON.stringify({ redirect:redirectURL, message : "Login successful", data :{ email:email, id: data.user.id, } }))};We use the signInWithPassword() method, that will create a session in our browser and manage the cookies for us.
Register
Section titled “Register”import {createServerSupabaseClient} from "src/lib/supabase";
export const POST = async ({ request, redirect, cookies }) => { // Parse form data from the request const formData = await request.formData(); const email = formData.get("email")?.toString(); const password = formData.get("password")?.toString(); const displayName = formData.get("displayName")?.toString();
// Check if email and password are provided if (!email || !password) { return new Response("Email and password are required", { status: 400 }); } const supabaseServer = createServerSupabaseClient({ request, cookies });
// Use Supabase to sign up a new user with the provided email and password const { data ,error } = await supabaseServer.auth.signUp({ email, password, options: { data: { display_name: displayName || email } } });
// If an error occurs during sign-up, return the error message if (error) { return new Response(error.message, { status: 500 }); }
// On success, redirect to the sign-in page return new Response(JSON.stringify({ status: 200 , message : "You have successfully registered. Please check your email to verify your user.", data :data }));};With the method signUp(), that creates a user in our auth table in Supabase.
Password recovery
Section titled “Password recovery”import { createServerSupabaseClient } from "@lib/supabase";
export const POST = async ({ request, redirect, cookies }) => { const supabaseServer = createServerSupabaseClient({request, cookies}) const formData = await request.formData(); const email = formData.get("email")?.toString();
if (!email) { return new Response("Email is required", { status: 400 }); }
supabaseServer.auth.onAuthStateChange((event, session) => { if (event === "PASSWORD_RECOVERY") { console.log("User authenticated via password recovery."); } });
const { data, error } = await supabaseServer.auth.resetPasswordForEmail(email, { redirectTo: '/auth/update-password/', })
if (error) { return new Response(error.message, { status: 500 }); }
return new Response (JSON.stringify({ status: 200 , message : "Email has been sent to change the password." , data :{ email:email, extra: data } },{ headers: { "Content-Type": "application/json", },}))};Here we use the resetPasswordForEmail() method, that will send an email with a recovery link that uses a one-time-use token to sign in the user and allow them to edit their password. This link will redirect them to a URL of our choosing.
Knowledge Check
Test your understanding of this section
Loading questions...