How to add a library to the project
There’s a very specific process to include a new library in our project.
Here’s a step by step guide using one of our basic libraries, the Marquee.
So, we want to integrate a marquee for the first time in our project, what do we do?
Step 1 - create the HTML
Section titled “Step 1 - create the HTML”First of all, we need to create the element that will hold our marquee and activate our JS class.
This would be an example of a simple marquee that has the numbers from 1 to 15 in it:
<ul class="c--marquee-a js--marquee"> {Array.from({ length: 15 }).map((_, index) => ( <div class="c--marquee-a__item" key={index}> {index + 1} </div> ))} </ul>So we can see here we are using the class js--marquee in our element. This is a pattern that we will follow everywhere we want to integrate a new library, using classes formatted as js--libName to activate our handlers.
Step 2 - add the library to our resources file
Section titled “Step 2 - add the library to our resources file”This will allow our off the scenes code to find our library to be able to import it.
export const getModules = () => {    return [        {            name: "Marquee",            resource: async () => {                const { default: Marquee } = await import("@js/handler/marquee/Marquee");                return Marquee;            },        },
        ...
    ]}
We need to get our class, be it from an external library that we have installed in our project or from a file in our filesystem. The marquee belongs to this second category, but this is an example of the first one, so you have one on hand too:
{ name: "Collapsify", resource: async () => { const { default: Collapsify } = await import("@terrahq/collapsify"); return Collapsify; }, options: { modifyHeight: true, }, },As you can see, this one also includes our modifyHeight property!
Step 3 - link everything together using a handler
Section titled “Step 3 - link everything together using a handler”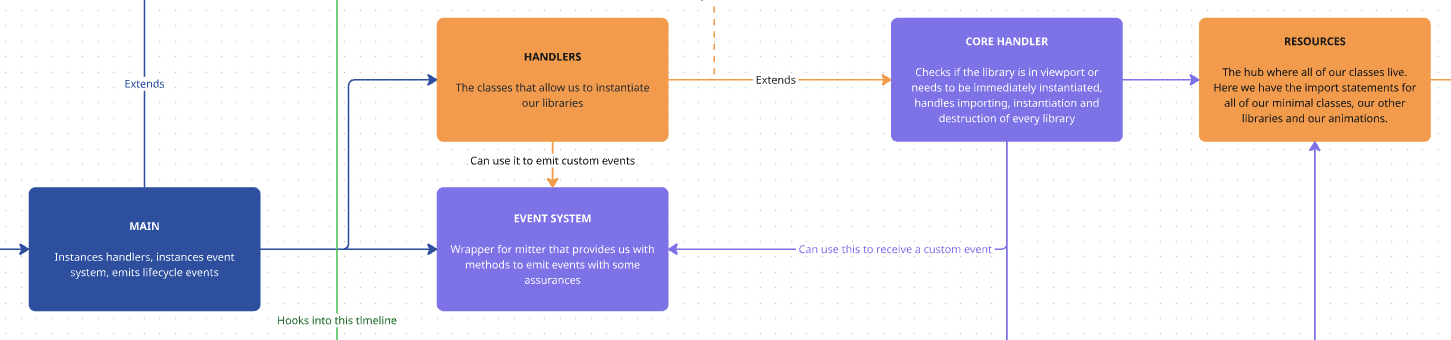
The way we’re going to let our project know we need to instantiate this new library and link it to our js--marquee element is through one of our handlers.
These are standardized files that will rely on our CoreHandler to automatically instantiate our library.
You have an example handler in the _handlerFolder folder, we recommend you copy paste this one and substitute the texts in it to create your new handler!
The first thing we’ll see in our handler is that it extends our CoreHandler, so it can use its methods to create and destroy instances of our libraries. The rest of its structure is as follows:
constructor
Section titled “constructor” constructor(payload) { super(payload); this.config = ({element}) => ({ Manager: this.Manager, element:element, speed: element.getAttribute("data-speed") || 1, controlsOnHover:element.getAttribute("data-controls-on-hover") || "false", reversed: element.getAttribute("data-reversed") || "false", })
this.init(); this.events(); }We pass the payload to our CoreHandler, activate our init and events methods and, most importantly, we create the configuration for our library here.
This configuration will always be a callback, for consistency and because most of the times we do need access to the HTML element we are working with.
This element is accessible to us through the callback because this configuration gets executed in the CoreHandler using our concrete element as an argument. This diagram explains the whole process in depth.
So, in this case, we want our marquee speed, controls on hover and reversed properties to come from the attributes of our HTML element. We did not have any of those elements in the element we used as a basic example, which would mean we would then be using the default ones we see in the config (1, false and false), but we could have an element like this one:
<ul class="c--marquee-b js--marquee" data-speed="12" data-reversed="true" data-controls-on-hover="true"> {team.map((member, index) => ( <div class="c--marquee-b__item"> <h3 class="c--marquee-b__item__title">{member}</h3> </div> ))} </ul>Which does assign those attributes and those would be the ones being used by our handler.
Our init method is very simple, it consists only of our sending the name of our library into our CoreHandler:
init() { super.getLibraryName("Marquee"); }It is very important that this name is the same we get from our resources file, since this is going to be the link between the two and the way for our CoreHandler to find our library in our modules.
events
Section titled “events”And here is where the magic happens.
events() {        this.emitter.on("MitterContentReplaced", async () => {            this.DOM = this.updateTheDOM; // Re-query elements each time this is called
            super.assignInstances({                elementGroups: [                    {                        elements: this.DOM.marqueeElements,                        config: this.config,                        boostify: { distance: 100 },                    },                ],            });        });
        this.emitter.on("MitterWillReplaceContent", () => {            if(this.DOM.marqueeElements.length) {                super.destroyInstances()            }        });    }
These events are the ones that we connected to the lifecycle hooks of our swup application in our Main class.
So MitterContentReplaced happens when we load a new page. In that case, we need to refresh our DOM, check if we have our element using our updateTheDOM helper function and send everything over to our CoreHandler so it can instance our library.
get updateTheDOM() { return { marqueeElements: document.querySelectorAll(`.js--marquee`), }; }We call our CoreHandler’s assignInstances method and we send our elements, our config and optionally a boostify distance that will override the default 30 pixels distance used by all our libraries.
Then, our MitterWillReplaceContent is hooked up to the exit of a page, so it is where we are going to execute our CoreHandler’s destroyInstances, to make a proper cleanup before going into the next one.
Final step: instance our handler
Section titled “Final step: instance our handler”This final step will activate our handler and make all of our work functional.
We need to go into our Main class and add our new handler into its init() method.
import MarqueeHandler from "@js/handler/marquee/Handler";
    async init() {        super.init();        new MarqueeHandler({ ...this.handler, name: "MarqueeHandler" });    }
Here we will be sending to our handler everything it needs to function, which we have in our constructor:
this.handler = { emitter: this.emitter, boostify: this.boostify, terraDebug: this.terraDebug, Manager: this.Manager, debug, eventSystem: this.eventSystem, };- Create the HTML element that will contain your library
-
- (OPTIONAL) Create your library class in the filesystem
- Add the library to the
resourcesfile
- Create a handler for that library or add your new elements to an existing one
- Instantiate your handler in
Mainif it’s new
Knowledge Check
Test your understanding of this section
Loading questions...