How to install a Terra WordPress project?
Prerequisites
Section titled “Prerequisites”Before starting, make sure you have:
-
XAMPP installed
- This provides Apache, PHP, and MySQL.
- Download here
-
Locate the project in Terra’s repository
- You need to know where to project repository is for next steps. Our naming convention for projects is
project acronym + wp-theme. Example:btw-wp-theme,sei-wp-theme. - Search it in Terra’s Github
- You need to know where to project repository is for next steps. Our naming convention for projects is
-
Download Wordpress
- Download here
01. Move Wordpress from downloads
Section titled “01. Move Wordpress from downloads”Move your Wordpress to the folder htdocs (this is a folder automatically generated by XAMPP, you’ll find it in Applications) with the name of wp-projectName.
02. Start XAMPP
Section titled “02. Start XAMPP”- Open XAMPP.
- Go to Manage Servers.
- Click Restart All (or start Apache and MySQL if they’re stopped).
- Confirm it’s working by visiting:
http://localhost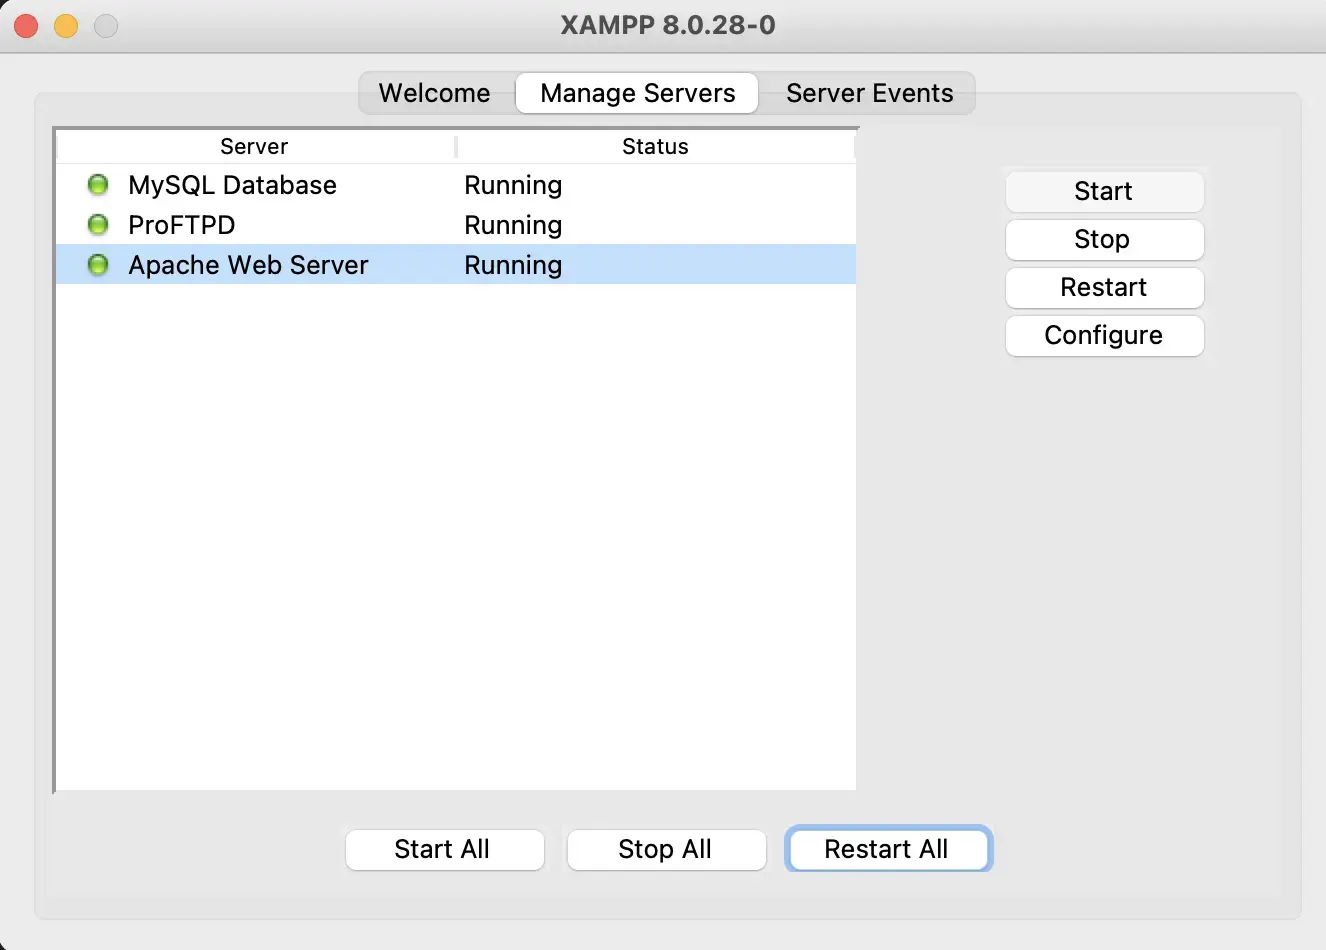
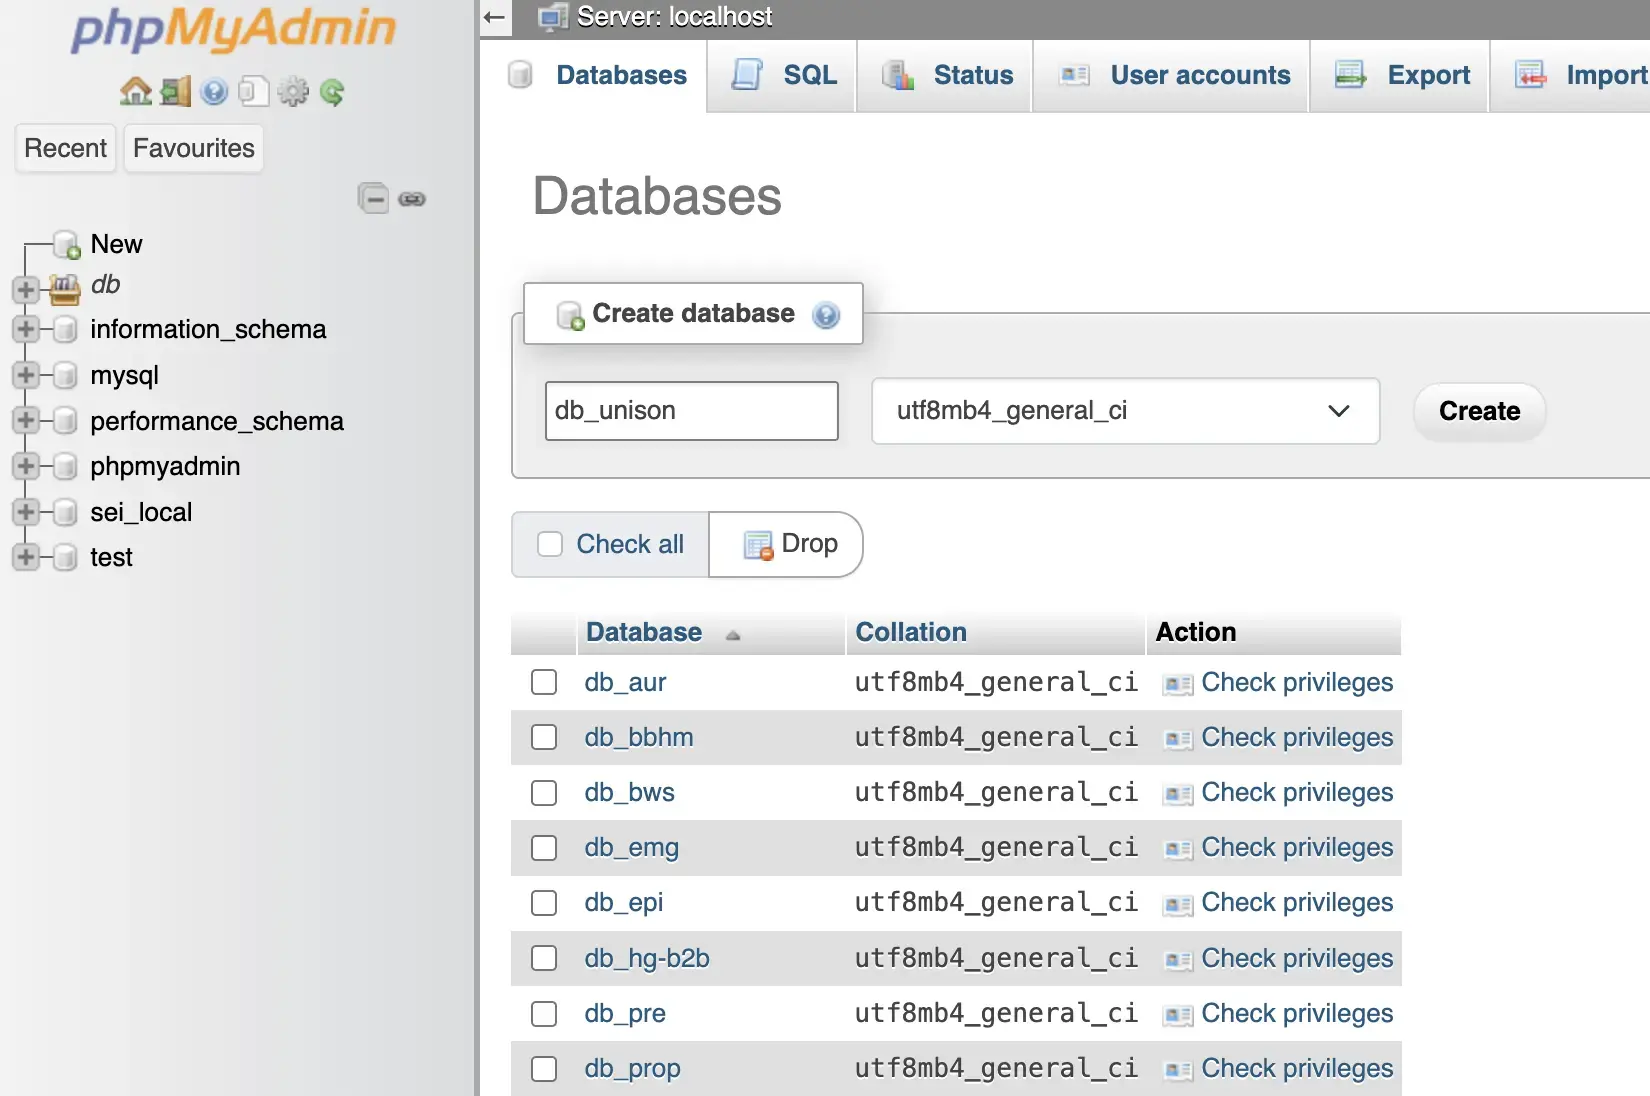
03. Create the database
Section titled “03. Create the database”- Go to
localhost/phpmyadminin your browser. - Click on Databases at the top.
- Enter a name for your database (we recommend using
db_projectName, being projectName the name of your project) and select Create.
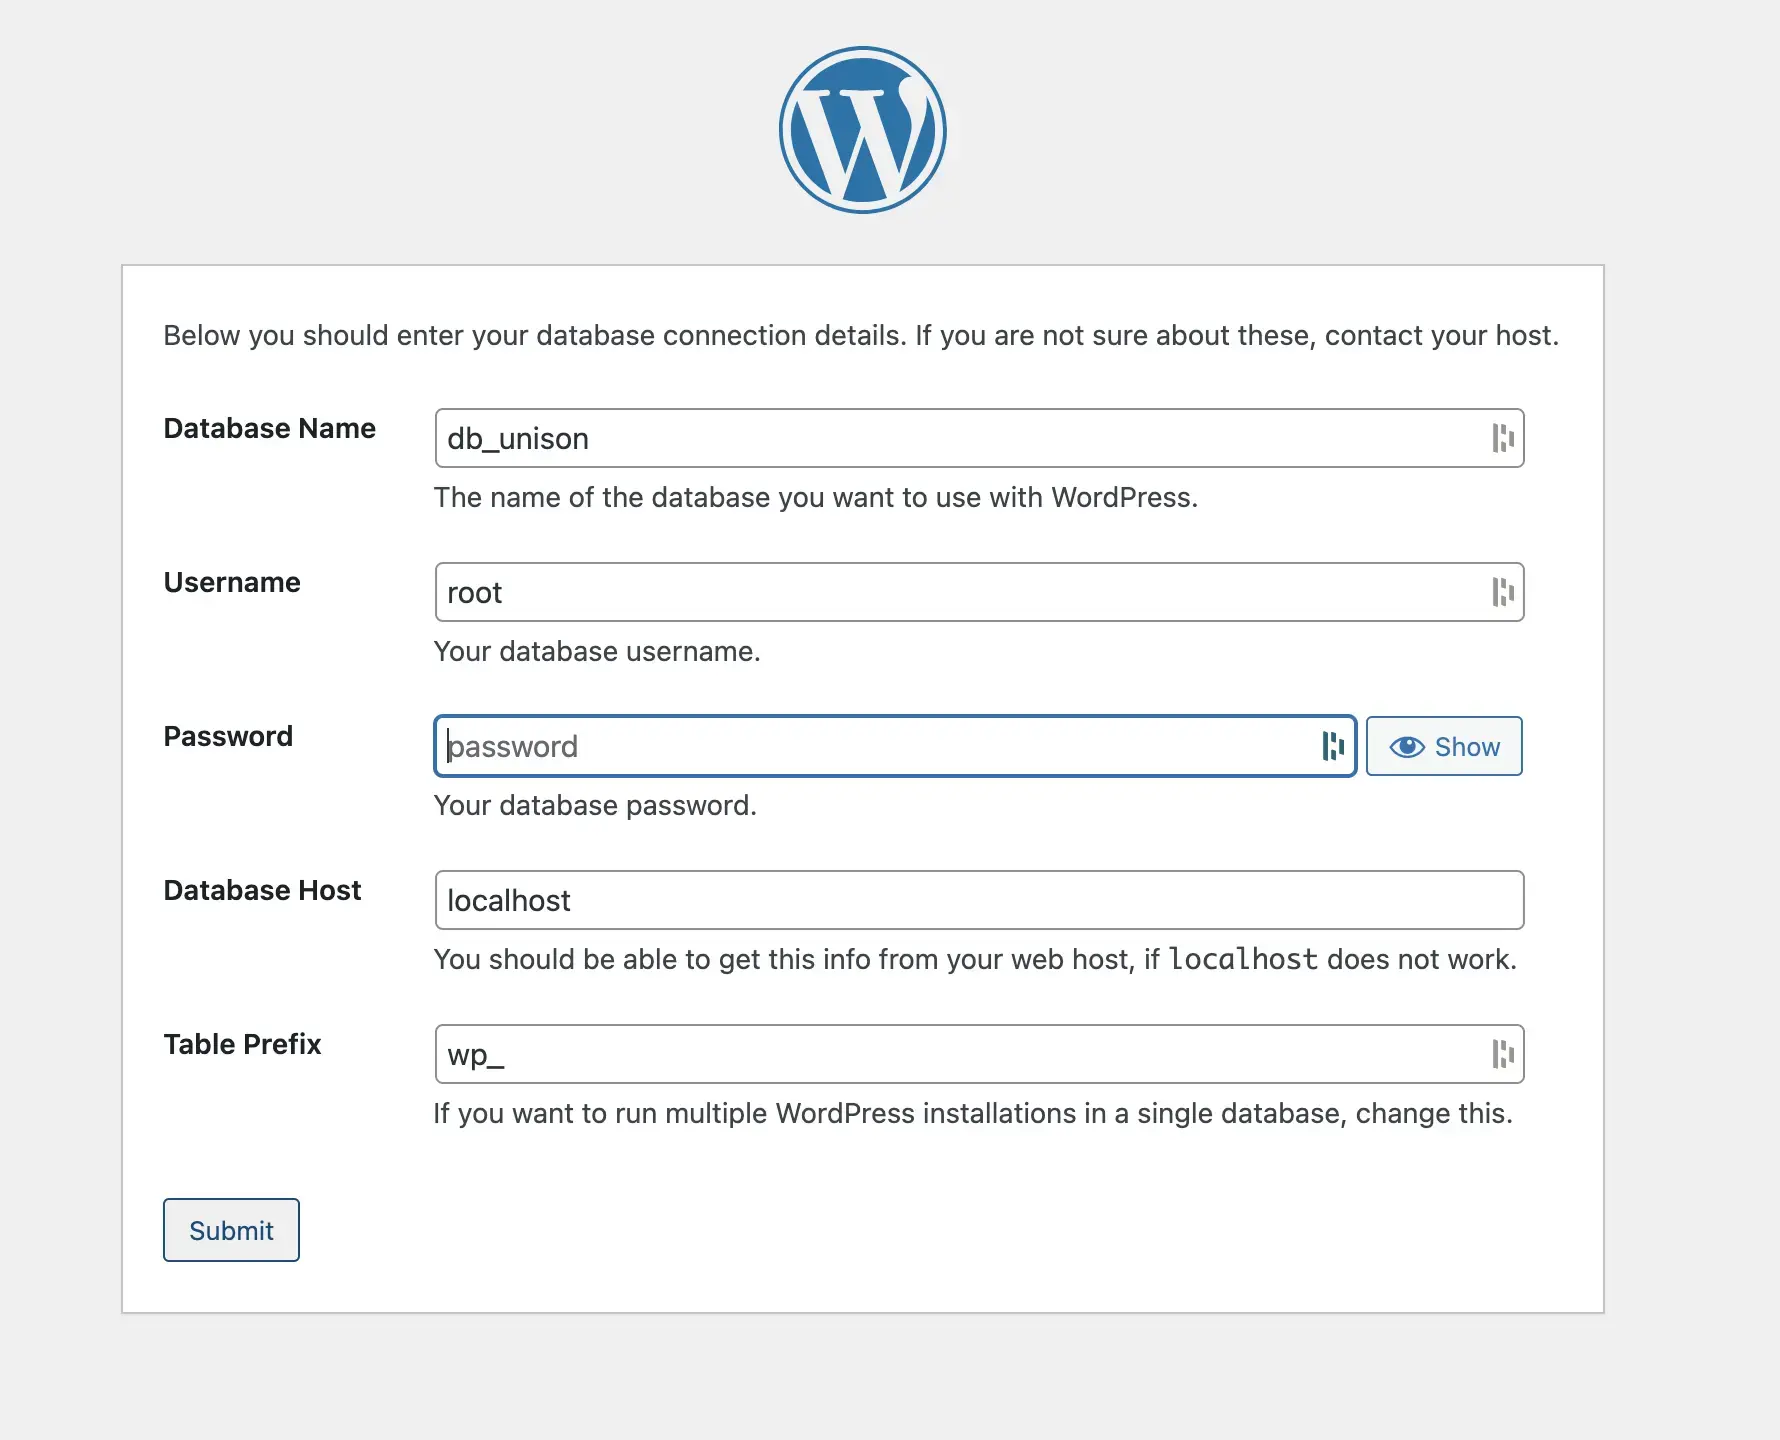
04. Install wordpress theme
Section titled “04. Install wordpress theme”4.1. Go to localhost/wp-projectName in your browser.
Section titled “4.1. Go to localhost/wp-projectName in your browser.”4.2. Fill in the info
Section titled “4.2. Fill in the info”Introduce the database name, in user go with root and leave password empty. Click on Submit.
4.3. wp-config.php
Section titled “4.3. wp-config.php”- A code will appear. Copy-paste it to your
wp-config-sample.phpfile, deleting what was before.
- Change the name of the file from
wp-config-sample.phptowp-config.php - Add these lines after the code you copy-pasted from the browser:
define('FTP_HOST', 'localhost');define('FTP_USER', 'daemon');define('FTP_PASS', 'xampp');define('FS_METHOD', 'direct');- Save the new file. Click
Run Installation.
4.4. Fill in the info
Section titled “4.4. Fill in the info”A new window will appear in your localhost/wp-projectName
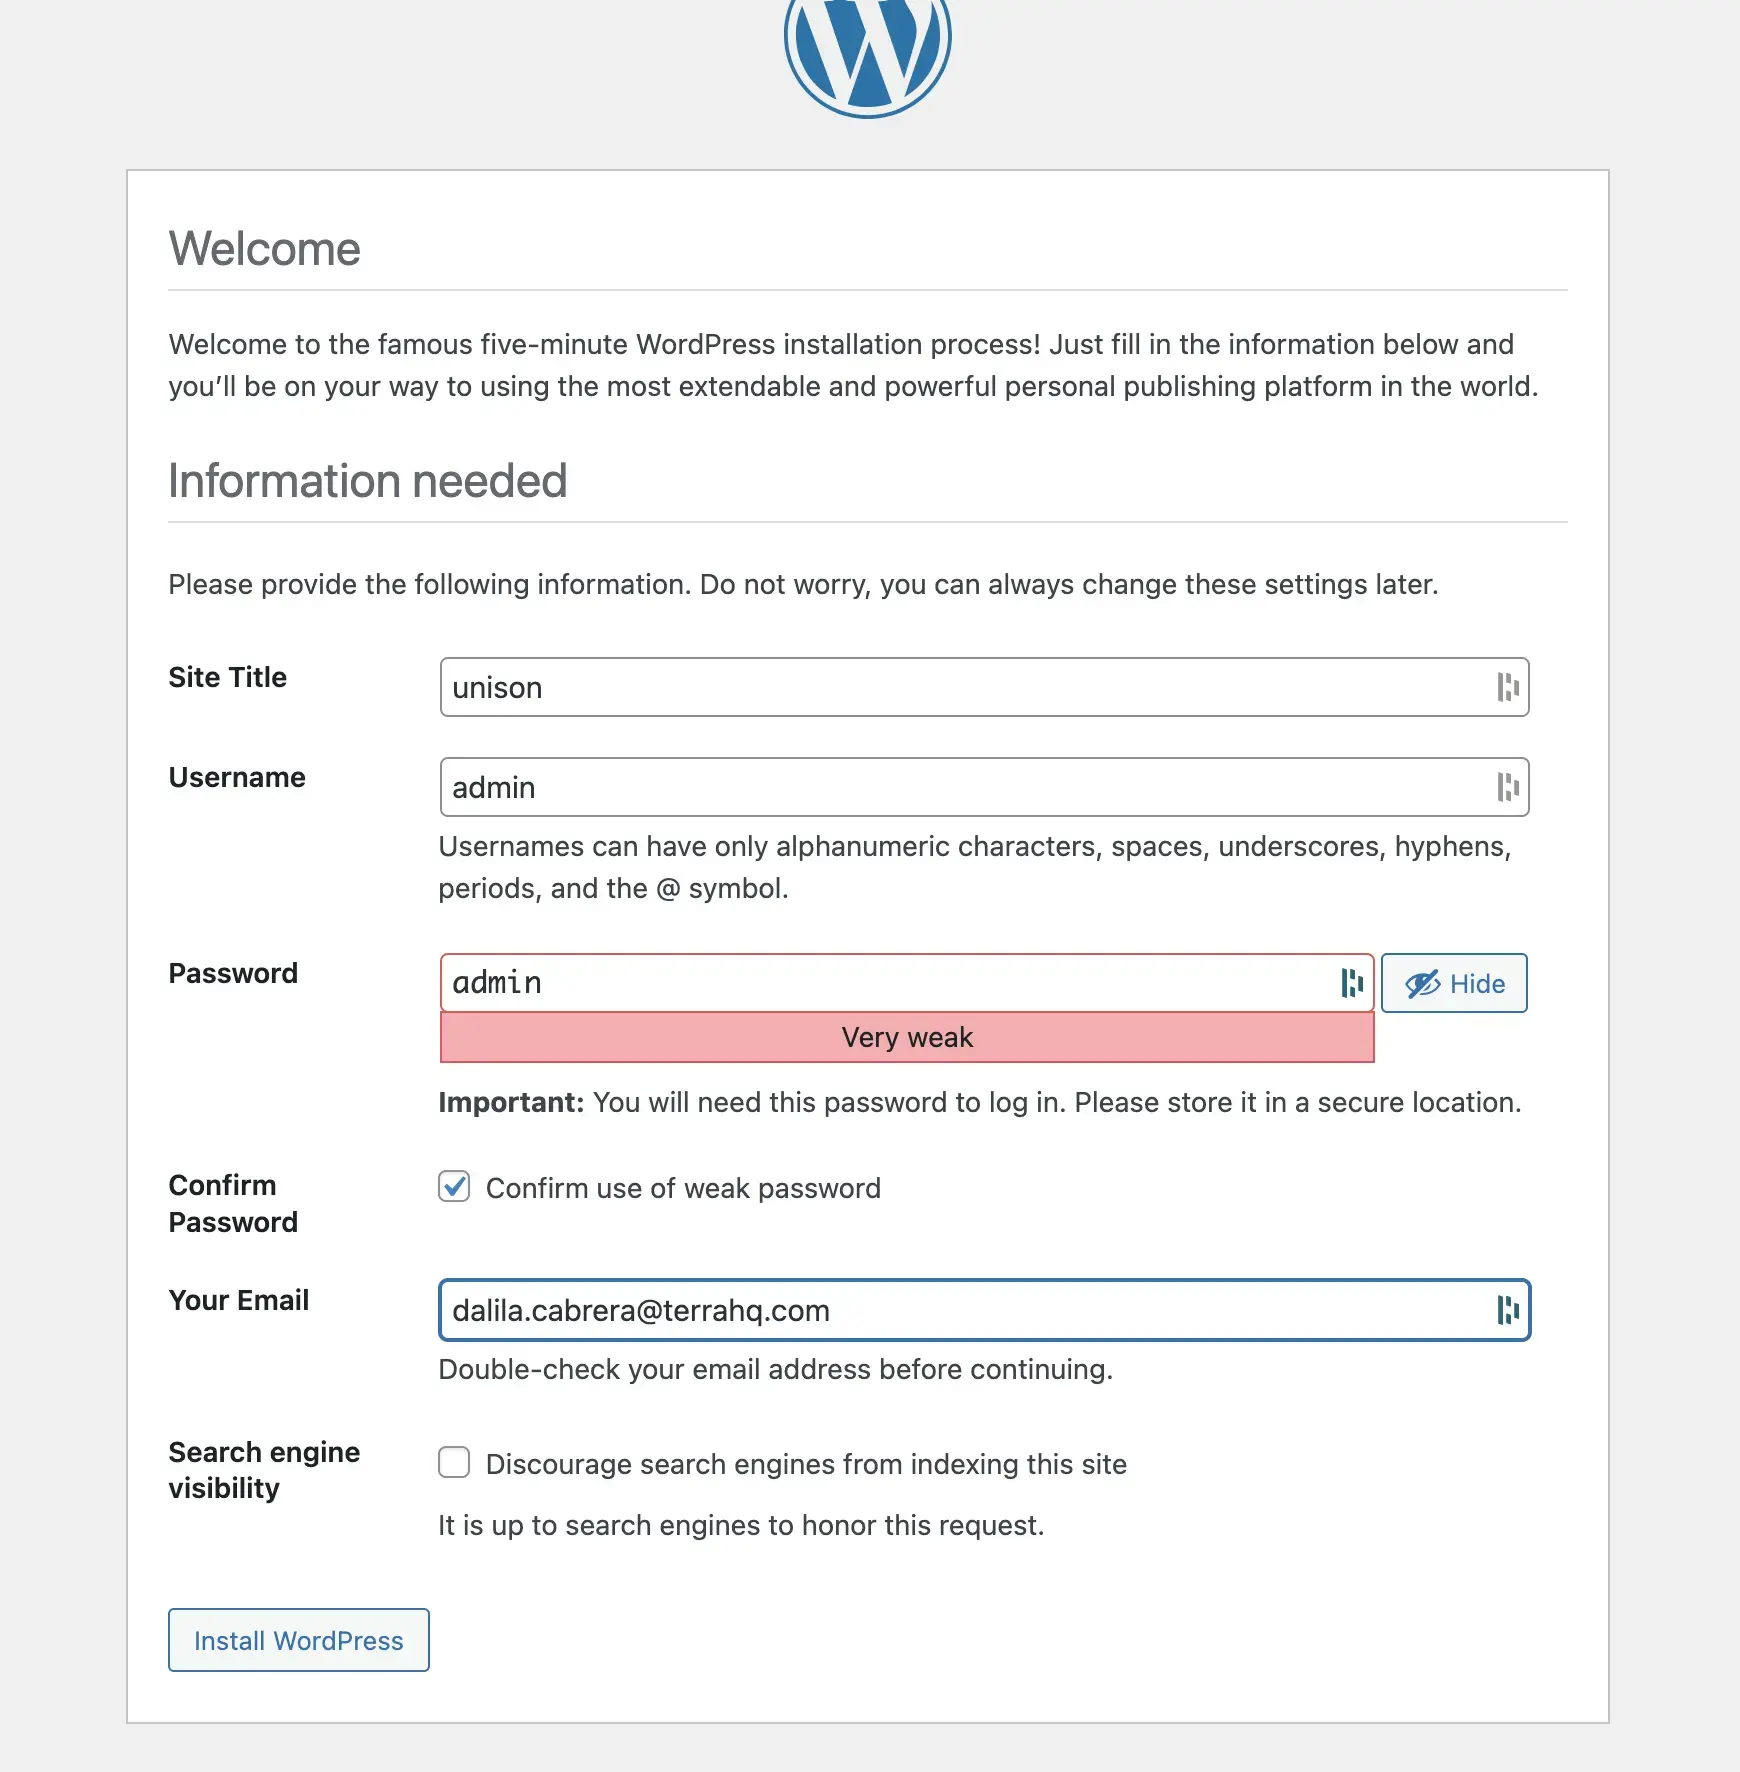
Use admin for username and password (confirm you know is a weak password) and write your email. Click Install Wordpress
05: htaccess
Section titled “05: htaccess”Create an .htacess file in your project root.
Copy this code into your .htaccess file:
<IfModule mod_rewrite.c>    RewriteEngine On    RewriteBase /wp-projectName/    RewriteRule ^index\.php$ - [L]    RewriteCond %{REQUEST_FILENAME} !-f    RewriteCond %{REQUEST_FILENAME} !-d    RewriteRule . /wp-projectName/index.php [L]</IfModule>
<IfModule mod_rewrite.c>    RewriteEngine On    RewriteRule .* - [E=HTTP_AUTHORIZATION:%{HTTP:Authorization}]    RewriteBase /wp-projectName/    RewriteRule ^index\.php$ - [L]    RewriteCond %{REQUEST_FILENAME} !-f    RewriteCond %{REQUEST_FILENAME} !-d    RewriteRule . /wp-projectName/index.php [L]</IfModule>
<IfModule mod_headers.c>    Header set Access-Control-Allow-Origin "*"</IfModule>
php_value upload_max_filesize 7Gphp_value post_max_size 7Gphp_value memory_limit 7Gphp_value max_execution_time 300php_value max_input_time 300
# Set unlimited request body sizeLimitRequestBody 006: Give permissions and log in
Section titled “06: Give permissions and log in”- Give permissions to your project using the console:
sudo chmod -R 777 /Applications/XAMPP/xamppfiles/htdocs/wp-projectNameYou’ll be asked for a password. This password is your computer’s.
- Log in into your local Wordpress with these credentials:
User: admin Password: admin08. Git clone of the project
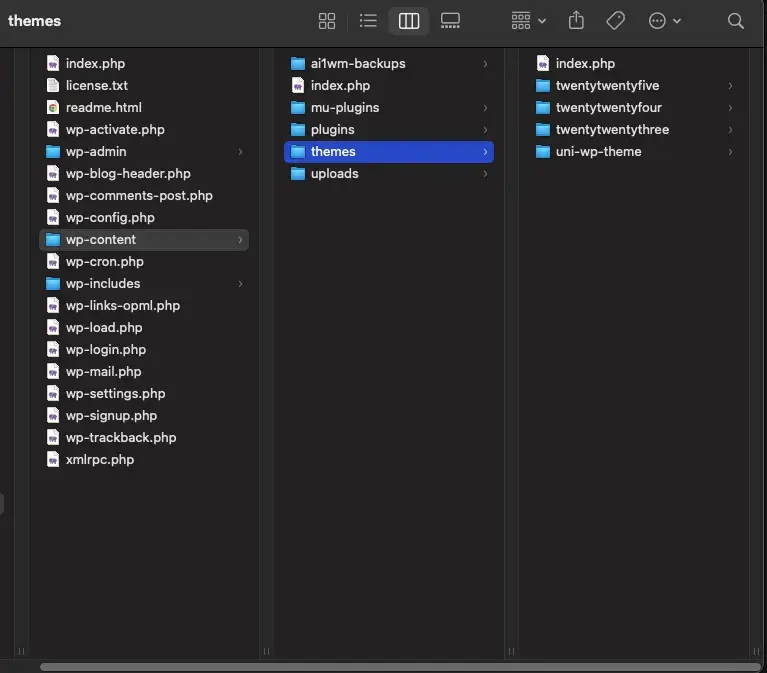
Section titled “08. Git clone of the project”- In your
htdocs/wp-projectName/wp-content/themesyou will find a folder namedprojectAcronym-wp-themethat theAll In Onecarried. - Delete the
projectAcronym-wp-themefolder (in the example bellow,uni-wp-theme. See the exact location following the rectangles)
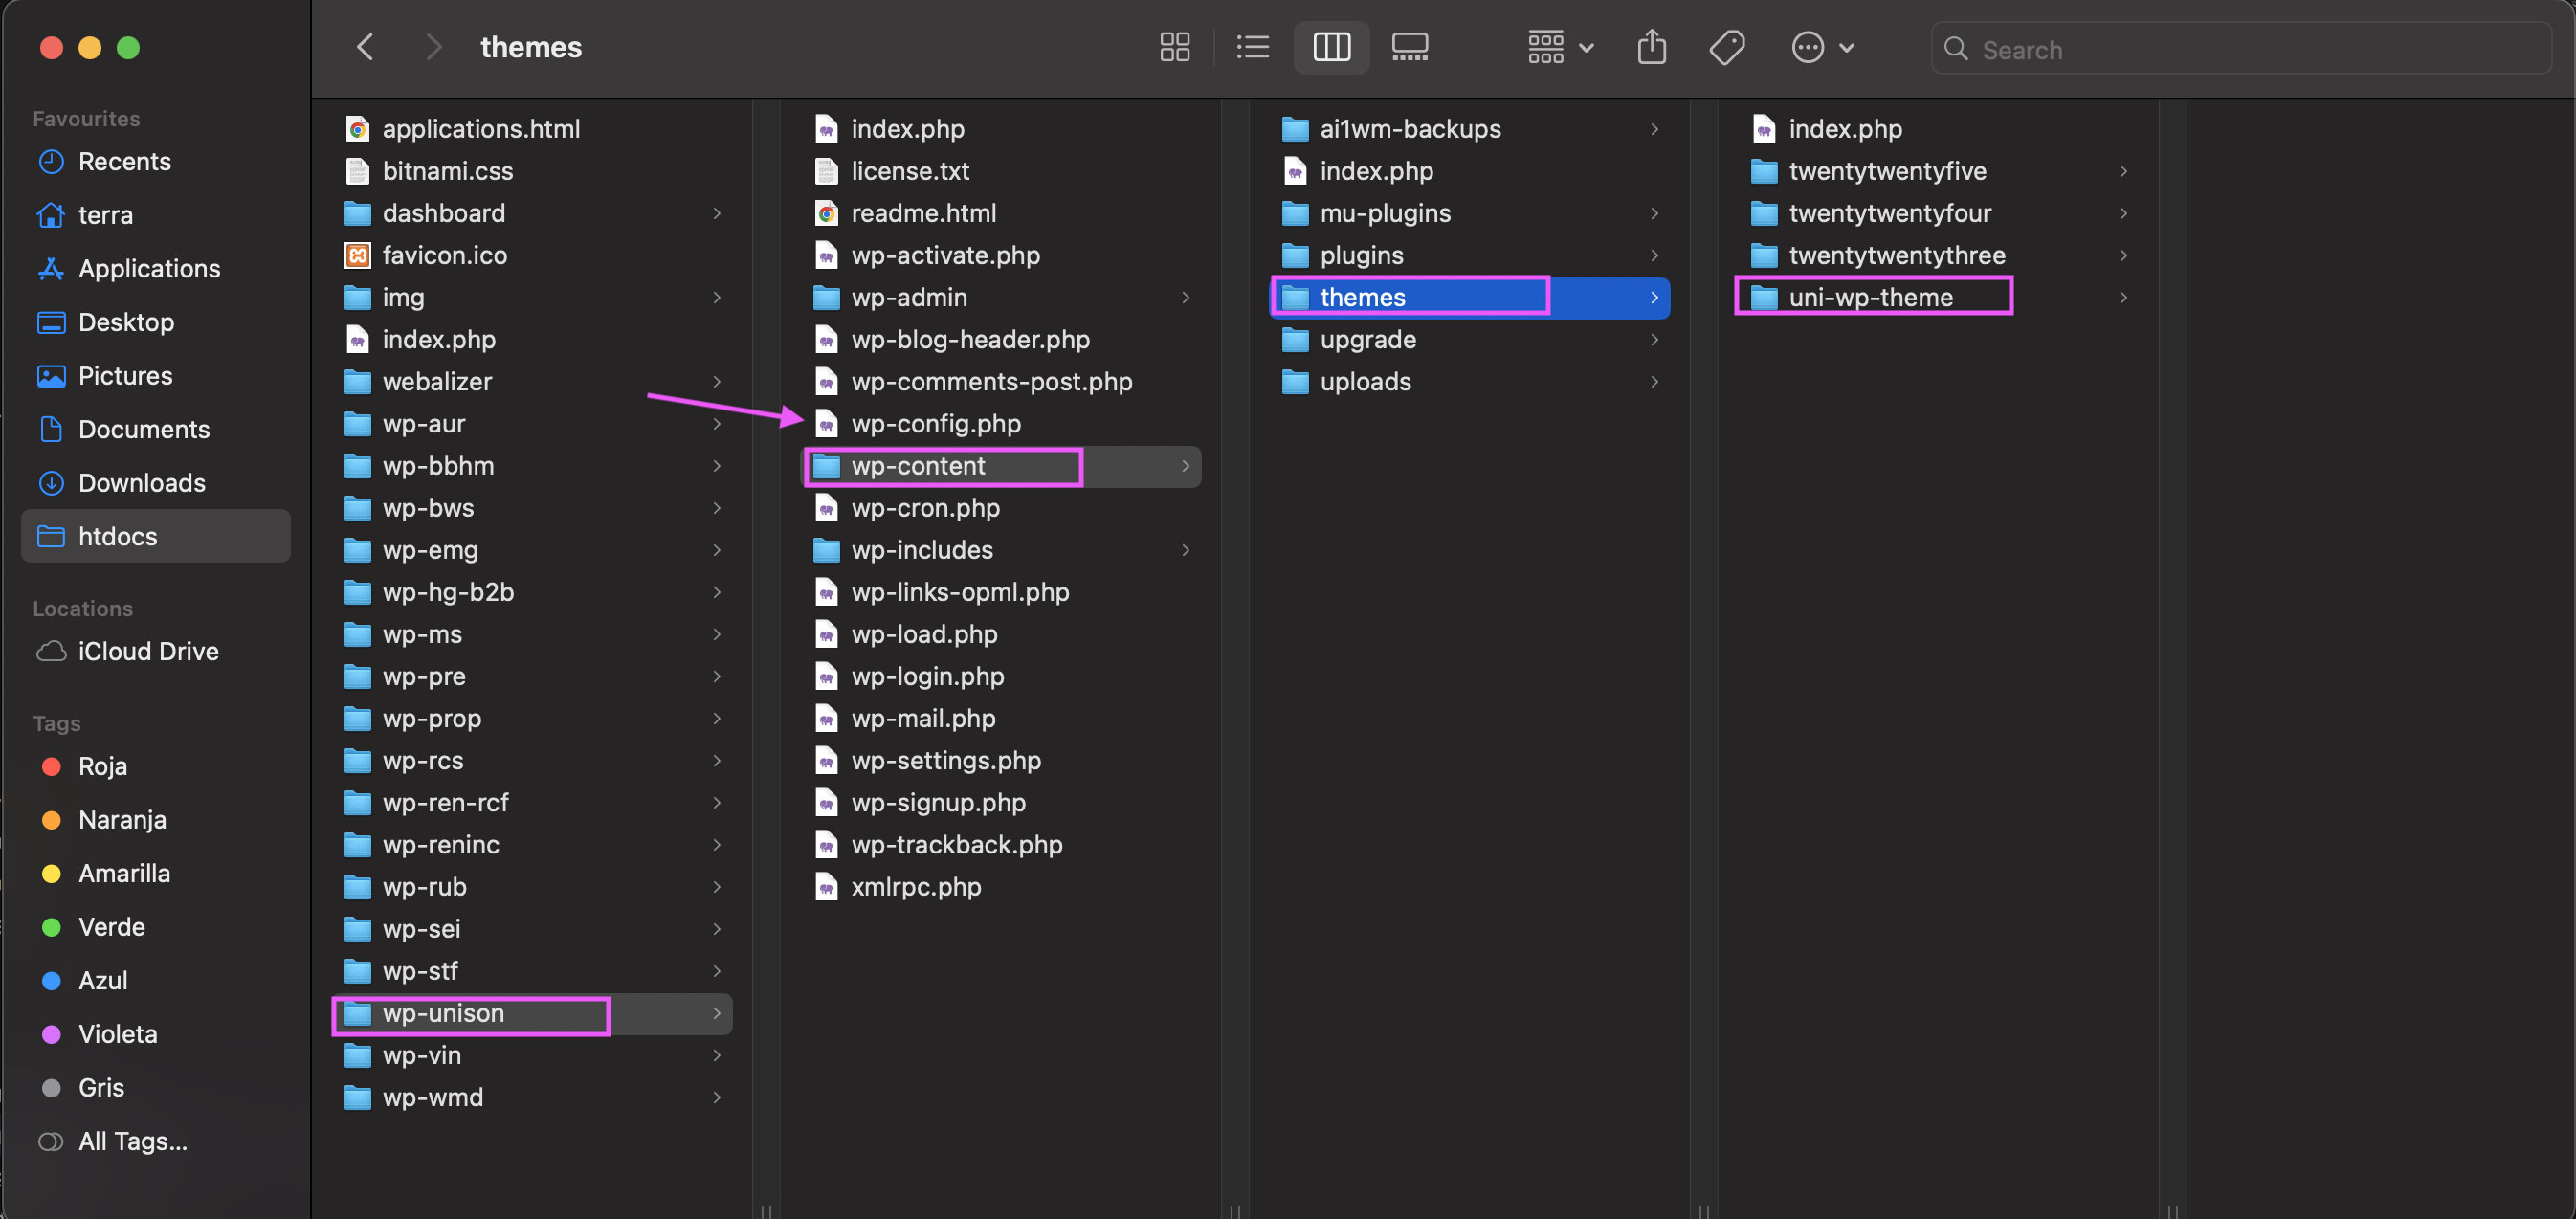
- Make a
git clonefrom the Terra’s Github repository into thehtdocs/wp-projectName/wp-content/themeswith the same name it had before (in the example bellow,uni-wp-theme)
09. Install the plugins the project needs
Section titled “09. Install the plugins the project needs”All In One usually carries every plugin the project needs, but it’s important that you know how to use them.
Every project has its own plugins, but you’ll see we work mostly with some of them.
Learn how plugins work and how to install them here.
10. Login with the correct credentials
Section titled “10. Login with the correct credentials”- Refresh the
localhost. You will be logged out andadminwon’t work if you try to log in. - Use the credentials you used to log in into the production Wordpress (find them in the project’s Slack channel)
Next Steps
Section titled “Next Steps”Your local WordPress installation is now ready! Now you have your local project connected to Github and aligned with the production project!
Now what?
- First, take a look at the Wordpress Structure
- Then, learn how your project is distributed and how to start working in local
- Once you’ve worked in your project locally, learn how to make a deploy
Knowledge Check
Test your understanding of this section
Loading questions...